
With HubSpot data sync you can create a one-way or two-way sync between HubSpot and your other apps to unite all of your customer data in one platform.
Learn more about what apps use data sync.
Integration requirements
- You must be a super admin or have App Marketplace permissions in your HubSpot account.
Connect the integration
-
In your HubSpot account, click the Marketplace icon in the main navigation bar, then select App Marketplace.
- Search for and select the app you want to connect to.
- In the top right, click Install app.
- In the dialog box, log in to your app account.
- Review the requested access permissions, then click Allow. You'll then be redirected back to the app page in your settings.
It's possible to connect more than one instance of the same third-party app to HubSpot. For example, if you're managing two Microsoft Dynamics accounts, you can connect and sync data from both accounts with one HubSpot portal. To connect an additional account:
- In your HubSpot account, click the Marketplace icon in the main navigation bar. Under Manage, select Connected apps.
- Click the name of the app.
- Click Actions > Connect another [third-party app] account.
- Proceed with the steps to connect the app to HubSpot.
Configure your sync settings
After connecting the app you will need to configure your app settings and turn the sync on to begin syncing data between the two integrations.
- In your HubSpot account, click the Marketplace icon in the main navigation bar. Under Manage, select Connected apps.
- Click the name of the app.
- Click Set up your sync.
- On the Choose an object to sync page, select the object you want to sync. Learn more about syncing contacts and leads to other apps.

Set up your sync rules
The integration will not delete contacts when they have been deleted in the other app.
- In the Choose which records sync section, decide how you want data to sync from HubSpot to your other app, and vice versa. There are four separate sync options you can configure:
- Two-way sync: all new and updated object information will be synced between the two apps. For records that already exist in both platforms, their properties will be merged. To configure this sync option, select All contacts from each dropdown menu.
-
- One-way sync from HubSpot to your other app: to configure this sync option, click the external app dropdown menu and select No contacts, then click the HubSpot dropdown menu and select All contacts.
- One-way sync from your other app to HubSpot: to configure this sync option, click the external app dropdown menu and select All contacts, then click the HubSpot dropdown menu and select No contacts.
- Use sync filters: to use this sync option, select a sync filter from each dropdown menu.
Please note: the sync filters limit the scope of the sync but don’t add contacts or companies to a list with that filter.

- In the Resolve data conflicts section, click the dropdown menu and select the default app that will overwrite the other when there are data discrepancies. If there’s no field value in the defaulting app, no data will be changed in the other app. This setting does not overrule the sync direction selected in the Choose which records sync section.

- By default, HubSpot will only sync contacts that have a valid email address. To turn this off, in the Manage duplicates section, clear the Only sync contacts with an email address checkbox.
During the initial sync, HubSpot will compare both databases. When a match is detected, existing records will be updated. Data sync matches contact records by comparing the contacts’ email addresses, then the company email address, name, and domains. For company records, data sync matches company records in each app based on either company name or domain name. For some connectors, the connector can only use name as the main identifier, as some apps don’t have a domain field.
Please note: when an app has both a company name and domain field, HubSpot will match two records if they have the same company name but the different domain, and vice versa.
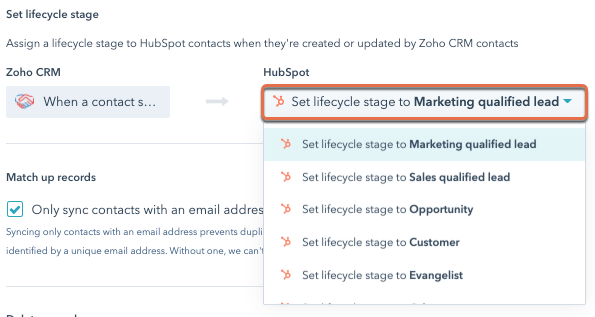
When a contact is created or updated by the app, you can assign a HubSpot lifecycle stage in the Set lifecycle stage section.
Please note: this setting will not appear for all apps. It will only appear for apps that have leads as a default object. Data sync does not support custom objects at this time.
Customize your field mappings (Operations Hub only)
In the Field mappings section, map properties in HubSpot with fields from each app. As you’re setting up the field mappings, take note of these restrictions:
- Each property can only be mapped once.
- Some property types cannot be synced (e.g. drop-down select properties, radio select properties, checkbox properties).
- Properties with multiple values cannot be synced in a custom mapping. This includes properties where each value has a label to differentiate between "home", "work" and "other", such as emails, phone numbers and addresses
- If you're syncing read-only properties, the sync will default to a one-way sync depending on which field is exposed as read-only.
- The app’s API may prevent HubSpot from reading a property. This is due to the app’s API returning the data type inconsistently.
Review how HubSpot properties sync to third party app fields, and vice versa below:
| HubSpot properties | Third party app fields | |
| Text | ⇔ | Text |
| Number | ⇔ | Number |
| Date picker | ⇔ | Date picker |
| Datetime | ⇔ | Datetime |
| Date picker | ⇔ | Datetime |
| Datetime | ⇔ | Date picker |
| Single checkbox | ⇔ | Boolean |
Additionally, the following fields in your third party app can be mapped one way to any HubSpot text field:
- Number
- Date picker
- Datetime
- Single checkbox
- In most apps this is also true for: dropdown select, radio select, or owner fields.
However, the following HubSpot fields can be mapped one way as text to your third party app's text fields:
- Number
- Date picker
- Datetime
- Single checkbox
- Multiple checkbox
- Dropdown select
- Radio select
- Calculation (number)
- Score (number)
To set up a field mapping:
- Navigate to the Field mappings tab.
- To add a new field mapping, click Add new mapping.
- Use the dropdown menus to select the HubSpot property and your app's property that you want to map.
- Click ✔️ Update.

- To turn off custom mappings, click to toggle the switch off.
- When you've finished configuring the sync, click Review in the top right.
- Review your sync and click Save and sync. The initial sync will then begin to process.
After the initial sync is complete, records will sync within 10 minutes of a change
Understand associations
HubSpot attempts to maintain the same associations between records (e.g., companies associated with contacts, or deals associated with companies) when syncing with the original app you connected, whenever possible.
To view records associated with contacts syncing from your other app:
- Click Actions on any of your object syncs > Edit sync settings.
- Click Field mappings.
- Click the All mappings dropdown menu and select Association mappings.
- You will see the record syncing from the third-party app and its association to the object.
Associated records will only be created if there’s a sync running for that same object. For example, if you have only a contact sync but no company sync, the associated company will not be kept in sync.
If you are participating in a beta that allows for multiple associations, please note that only primary associations will be synced.
Understand sync health
Sync health is a set of diagnostic tools that lists all records currently syncing between HubSpot and your third-party app, records that have been excluded from the sync, and records that are failing to sync.
- In your HubSpot account, click the Marketplace icon in the main navigation bar.
- Click the app.
- Click the Sync health tab.
- You can view the sync status between the two apps. This shows what the sync is doing at any given moment. The types of statuses are:
- No active syncs: the sync has not started or it’s currently paused.
- (Number of) contact/companies scanned: the sync is scanning and updating contact and company records in both HubSpot and your other app.
- In progress: all indexed records are being updated in accordance to your sync rules and field mappings. The amount of time this takes varies depending on whether this is an initial or ongoing sync, how many records need to be updated and kept in sync, and the speed of your other app's APIs.
- Active and listening: all records are up to date and the sync is actively monitoring HubSpot and the corresponding app for updates, changes, and newly created contacts/companies. Changes are synced instantaneously in HubSpot, and can take up to five minutes to sync from your other app.
- Contact/company sync queued: HubSpot is unable to sync between HubSpot and your other app. No action needs to be taken to resolve this state. There are three possible reasons:
- Different objects need to be synced. One object needs to finish syncing before the next one can be synced (for example, if syncing both companies and contacts).
- A rate limit has been reached in the syncing app. Once the limit has been adjusted, the sync will automatically continue again.
- Due to multiple reasons, the action is currently in an internal work queue and will be automatically synced shortly.
- Changes made to records in HubSpot are automatically synced, while HubSpot polls the other app for changes every five minutes. To manually trigger a sync between HubSpot and the other app, click Sync now. Otherwise, changes will be synced to HubSpot every five minutes.
- To view the number of contacts in each status and error details in the right panel, click the In sync or Failing to sync card
- In sync: lists all records that are currently syncing between HubSpot and your other app. Records are kept in sync as long as they match the sync filters selected in your settings.
- Failing to sync: lists all records that are not syncing between HubSpot and your other app.
- In the Failing to sync panel, hover over the tooltip to find out more information about the error.
- To view which records are not eligible to sync, click Records excluded from sync. This lists all records that do not match any of the filters that have been setup inside the sync, or records that do not have an email address.
Turn off data sync
You can turn off data sync to prevent records from the app from syncing from HubSpot, and vice versa.
- In your HubSpot account, click the Marketplace icon in the main navigation bar. Under Manage, select Connected apps.
- Click the app.
- Click Actions > Turn off sync.
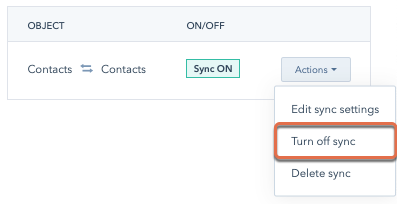
- In the pop-up box, click Turn off sync.
Once the sync has been turned off, you can turn it on again by clicking Edit sync settings, or delete the sync.